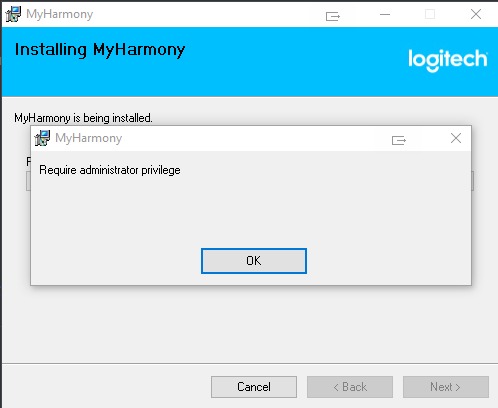
Perhaps some of you experienced that, Windows 10 automatically removed a program that is known to be not fully compatible with the next major Windows version. It happened with SpyBot – Seek & Destroy e.g. and it also happened with Logitech’s MyHarmony’s Windows version of their app, too.
And once you downloaded and tried to install it, you see the following error:
In the past, I have been using Buffalo NASes to store my backups with Acronis True Image 2021 on them and was all happy. Cases were available for 30-80 € depending on time and model that you bought. Not bad.
Now, Buffalo appears to have cut the robe, as Amazon and others no longer offer them for purchase.
Hence I had to move towards a different brand, but didn’t see myself spending 150-200 € for just a 2 bay NAS case of Synology.
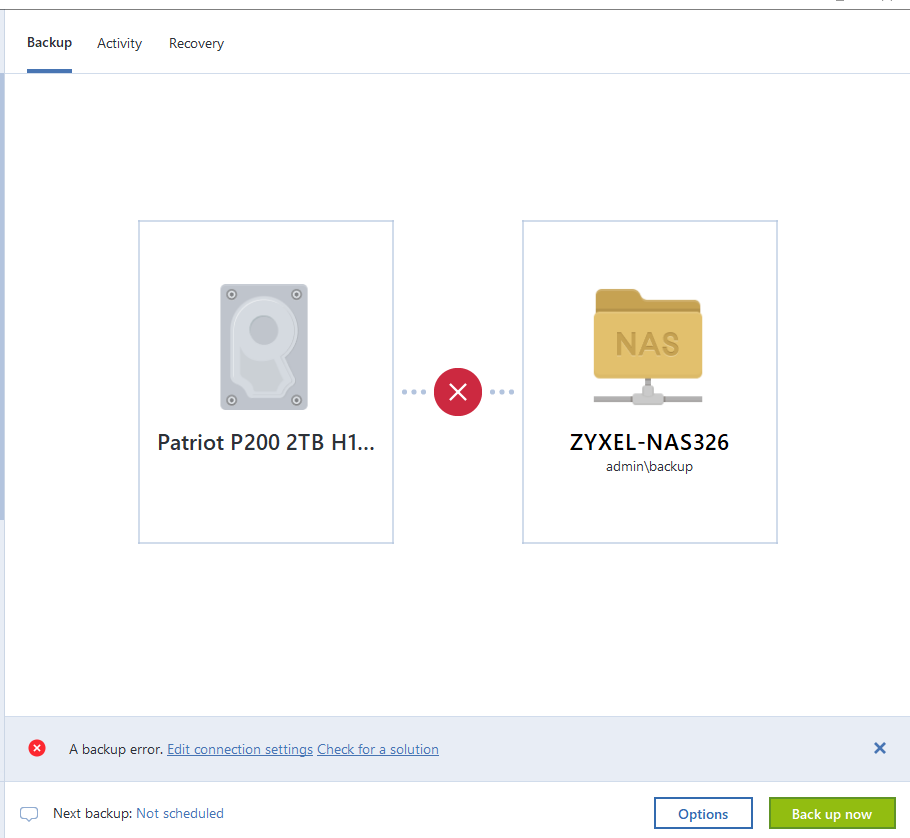
I found a Zyxel NAS326 for the price of 95€ and went for it. I put in my 2 Seagate IronWolf 10 GB NAS HDDs in it and after a swift initial setup I was happy and started my first backup with True Image, however, there would always be “A backup error. Edit connection settings.” after 1 h and 18 mins. Even when I resume the backup, it would stop at a further progress stage of the backup, after 1h and 18 mins yet again as this screenshot shows:
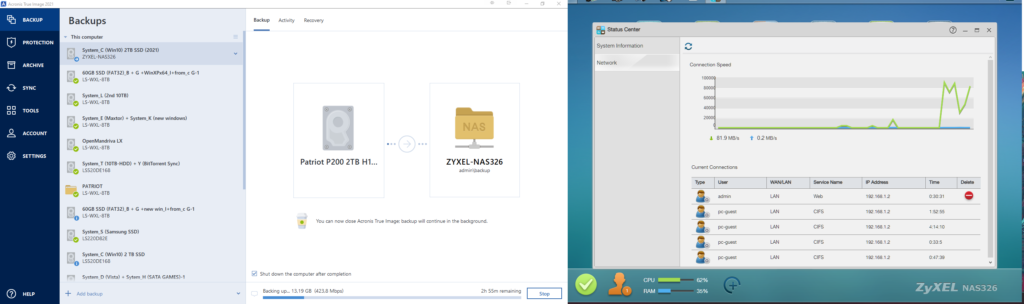
The NAS case has, in contrast to Buffalo’s enduser NAS cases a lot of sensors and real time monitors, so I had a look at what exactly happens.
It appears – the NAS being connected to a 1 Gbits LAN port of my Zyxel Managed Switch daisy chained from a AVM Fritzbox 7590 router, that the CPU would have a constant utilization of 60-100% which after 1h and 18m would lead to the NAS just halting and in this very second also its web gui being inaccessible.
Now, with my Zyxel GS1900-16 Managed Switch, I tried to minimize the load to the CPU of the NAS by limiting the traffic of the Port 16 where the NAS was connected to.
It would slow down the speed of writing to the NAS accordingly, but the CPU would still read the same load.
The final solution was indeed to change the Port’s detection mode of Auto to 100 Mbits
At first one would think this means a huge increase for the time it needs to write the data to the NAS. Errr, it depends. seeing that when the port was at 1 Gbits, the constant changing of the transfer speed wasn’t favourable either. As a matter of fact, the difference between what True Image 2021 predicted at frst for 1.4 TB to write, was 4 hours. With the 100Mbits port setting, this changed to 7hours. I rather have a slower and reliable connection to the NAS to write (and read from in case of required recovery) than a fast but instable one.
Now how about incremental and differential backups? Plain No. Because the read and write operations combined cause so much traffic to the NAS’ CPU, that it freaks out again after 1 hour 18 mins!
It’s a known issue for many Zyxel NAS models since 2013 and despite my particular model received last firmware update in April 2021 one would think they have done something about it by now. Spoiler alert: They didn’t.
I have received the following statement:
“I have asked here once internally and unfortunately this is not officially supported by our models, which is why no adjustment will be made in this direction in the future.
Unfortunately, we in support have no further influence on the decisions of our development department here, even if I would like to offer you a solution.”
Thank you for nothing Zyxel. Really!
So what about incremental or differential backups, I hear you ask? You can’t. The constant read and write combined operations will freak out the internal CPU again.
Despite one of the main reasons to get a NAS and use it is to write backups to it, if you do on Zyxel NAS, they will tell you, you are not supposed to!
Could the problems be fixed by Zyxel? Oh certainly! Slowing down things to avoid overload/overheating, etc is a common thing, they could as well slow down transfer speeds when the CPU freaks out rather than just the NAS losing network connecting.
This NAS has so many sensors for utilization, heat and fan speed inside, they could use them to regulate the load!
the Steam community often comes up with helpful guides on how to get old games patched to run in Windows 10. The same is valid for Cossacks,
However, it fells a bit short on assumptions that you don’t need the English language file as Steam’s installation is the English one. But what if you have a CD original in another language and don’t want to pay money to buy the game a 2nd time?
This is what happened to me, so let me help you out.
After installation, you are confronted with the error message “Please log in with administrator privileges and try again” which is because the copy protection driver is blocked by the security mechanism of Windows 10 as you can read in this German article
So what you need is a no CD patch. Once this has been sorted out, follow the guide on how to apply a patch for Windows 10 compatibility of the Steam guide I have linked above.
Last but not least, to change your games’ language, use the same guide, but download this English language file taken from the comment section where I requested the original author of the guide to make it available. Download is broken? then contact me if you need the file.
Readers of this blog might have figured out by now, that getting old devices and software to run under newer non-supported Windows version is one of my things. I am happy that I have learned while working at my Scene World project, that reporting bugs to open source projects is king.
So I remembered Funk-Flitzer aka 3-D-Ultra-Radio-Control-Racers from childhood and wanted to buy its German release over Amazon Marketplace, an edition having this and the MiniGolf game on the same CD. The seller sold me a version only having the golf game on it. so I made a deal to get half of the purchase refunded and keep the CD regardless. They agreed, and this way I found that this is a re-branded different version than what Matt Jernigan was aware of, hence his patcher failed on me.
Last October, I noticed that the Windows 64bit patches no longer worked with latest Windows 10 updates installed and latest Nvidia GameReady drivers.
I found there is a different way of getting it to work. Here is what I wrote to Nvidia customer support on how I’ve fixed it:
I have fixed it. There is a mod available for Dune 2000 called “Gruntmods Edition” and when I installed it, I installed it in the same base folder as all my other “old games” (non-Steam) and it accidentally caused this to install it in the same directory the broken Dune 2000 (installed via these instructions) Install was.
And it made the old installation playable if I run the Dune2000.EXE instead of the .EXE of the mod. So I am not using the mod even, only whatever they fixed (last update was in April 2019 in contrast to the original WIndows 10 64bit Patch (which was from June 2016) which only works with all Windows Updates installed no older than June 2000, the mod patches the file to even run with a fully updated and current Windows 10 installation
In 2006, I have put together another PC of mine, it was also the year in which I switched slowly to 64bit Windows. 1 year before Windows Vista, I had installed Windows XP 64bit. I put a 64bit CPU in this machine, so why not taking use of it?
I remember reading in a German paper mag at the time, that the game from a Russian game studio – the racing game “Adrenalin” was quite cool – errr…. not really. But I remember it for its cool rock music pieces by Russian artists.
I am doing regular backup of my stuff since year 2000. 2006 marked also the year I decided to go multi HDD, and multi OS for retro games or older game installations (A concept that I gave up since Windows 10 is the “last Windows” by Microsoft to be released – I still have a Windows XP 32bit running and a Windows 7 as a backup OS to boot if Windows 10 would fail on something) , so it happened to be that my main OS would still be Windows XP 64bit.
The German version was released by “Froggster Interactive” (Yep, the same publisher that would bring “Speedball 2000” to PC via Steam in 2008).
I remember complaining that the copy protection was not compatible with 64bit Windows XP. I was told “We support 32bit only”, so I was forced to use a no-CD patch 😀
Now just found out that the game is abandonware and can be downloaded in its English version (published by “1c”) without copy protection and supporting 64bit Windows!
Even the save game file from 2007 still works, so now I can resume my career from 14 years ago! Lovely! 😀
And of course it is fully Windows 10 compatible as well! Wow!
So, as I got a Honeycomb Yoke, I had the problem that in contrast to HOTAS devices, yokes like the Honeycomb do not some with a Trust Lever.
The solution was for me the Thrustmaster Quadrant Airbus Edition and running is without the flight stick that is also available as a combo with that device.
Now, while installing the TFHT driver package made it working in Windows 10 and discoverable in Flight Simulator, nothing was assigned to it. As I tried assigning everything manually, I failed in doing so, so I asked Thrustmaster tech support for help and they send me a detailed PDF called “abnormal procedure” that I want to share with you:
I don’t know if it has anything to do that I bought my physical copy of Metro 2033 at Amazon Germany, but even the normal troubleshooting route, with the Steam Community, Nvidia or THQ Nordic would result in a working game for me.
So here is what I sent to THQ Nordic, Nvidia and the Steam Community as a solution:
Hi there!
Hi there all, thanks again for going on with troubleshooting with me. Since neither a discussion thread on Steam Boards , nor NvIdia or THQ Nordic tech support could help me. I wanna share the solution which was posted recently in a German thread on this game’s Steam discussion forum: Go to the game properties in Steam and change language from English to German. The game will still be in English by the way but it will run flawlessly.
Why that is no idea. But I wanted to share that the said solution also worked for me! 🙂
If you wonder why the Skype Cloud Recording only records 8 frames per seconds, worry not, you are not the only one having this issue. In fact this change has been done globally for all users using Skype. Due to the pandemic, the amount of users signing up to Skype has risen a load and the server load skyrocketed. In order to balance out this load, the recording functionality has reduced the 15 fps to 8 fps temporarily until March 2021.
The team who made this decision didn’t bother to tell tech support department about it, hence nobody knew about it when I contacted tech support about this first.
I went through all support levels until I have reached T3 which just called me this morning, to inform me about the situation.
having fully dug into PC gaming in 1995, the world was clear for me.
You had a CD version of games and disk versions. CD versions were also called “speech versions” or “talkie version”.
prime examples for me were games like Monkey Island, Sam & Max, Simon The Sorcerer.
Now that Command & Conquer Remastered Collection got released, I started orienting myself backwards towards DUNE.
I understood that there is a disk version (1992) of DUNE the strategic adventure and a CD version with voice overs (1993). According to wikipedia it is also claimed at the time of writing this , that it was the first game ever released on CD-ROM.
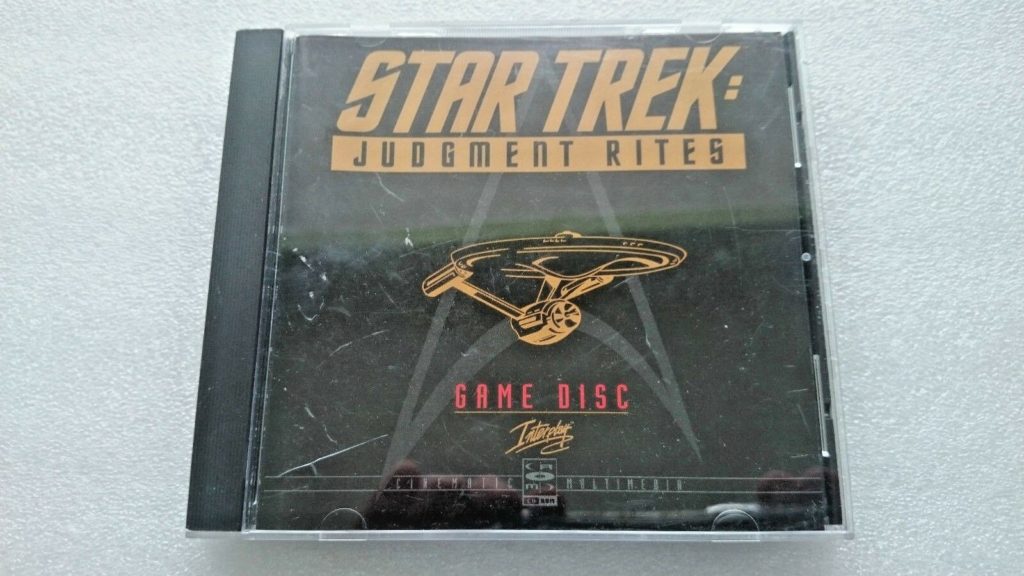
Another Wikipedia entry says that however the game Star Trek 25th Anniversary was released in 1992 on disk AND CD with voice aka walkie talking version, weird. Just checking on another wiki, there it says the CD version was released 1993
Its successor Star Trek Judgement Rites however was even released in more CD versions than just the talkie one, i.e. the CD version would feature better graphics and more cut scenes like the “movie and sound pack” that was available for the disk version originally.
Then there was obviously another edition of the CD version released on CD in 1995 (The same year the Mac version was released) which was the talkie version of this game.
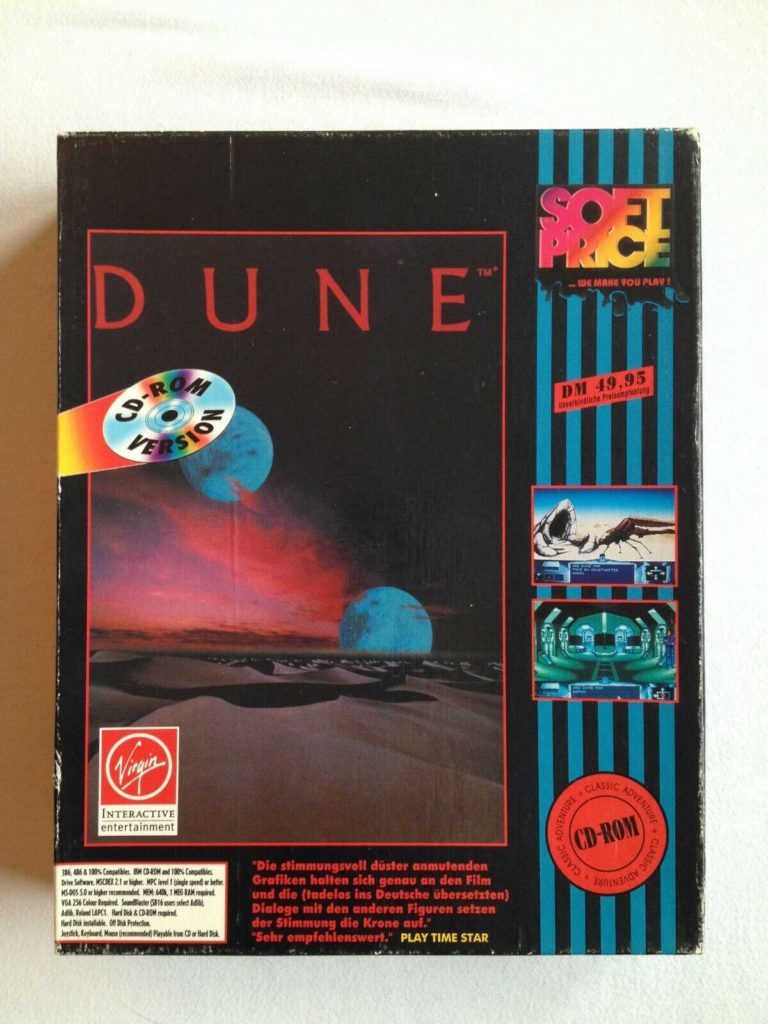
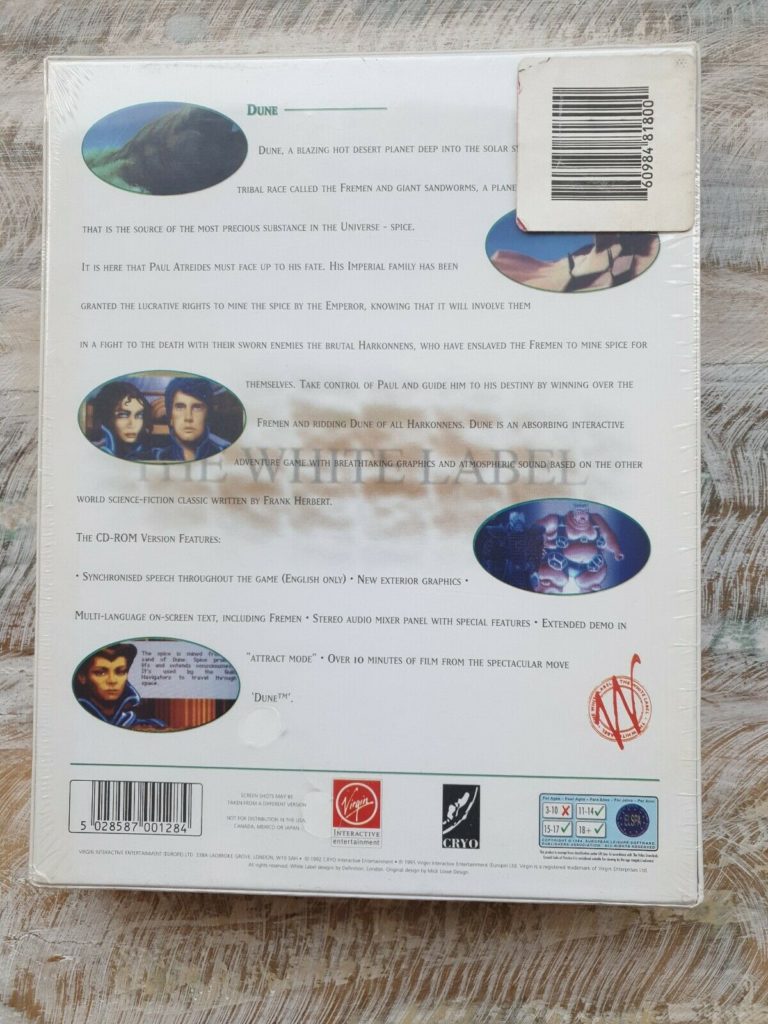
For DUNE e.g. you can find out that the CD Versions from the SOFT PRICE line, are simply 3.5″ disk version copied 1:1 onto CD, so the speech is missing here:
even if it says “CD-ROM Version” on the front, don’t buy it!
The While Label release however even mentions the voice performance on its back of the box:
Now having a look however on the White Label Start Trek 25th Anniversary / Judgment Rites CD Collection you find that only the first is mentioned for its voice performance on the back of its box:
Despite this was released in 1993, the same year Judgment Rites CD version was released, this does not contain a talkie version.
The talkie version was released in 1995 however:
So for some games, the CD versions are sometimes not the ones you are after!
By continuing to use the site, you agree to the use of cookies. more information
The cookie settings on this website are set to "allow cookies" to give you the best browsing experience possible. If you continue to use this website without changing your cookie settings or you click "Accept" below then you are consenting to this.